Wednesday 31 July 2013

Wow it's Wednesday again

Who keeps arranging for the weeks to rush by? Meh - not me, for sure.

All I can report is more lattice quilting. I'm liking it, although it's not nearly a soft as some straight line quilting would have been. However sometimes you need to sacrifice function over form. So says my Dolce & Gabbana high heels, and they would know. 

This is where it's at. I keep swapping between the stippling and the straight lines to keep my interest up!


Not so much progress on the EPP. I managed to pack some fabric in a bag when we headed off to hospital with the wee man, but I've only just got it out again. 


EPP is much more tv friendly in the evening, so I really need to get some more diamonds glue basted. I'll report back next week!


I'm thinking about having a giveaway soon for my lovely and discerning blog followers.  Do you think so too?  It's past time to celebrate a six month bloggiversary and my imminent return to work. I'll see how organised I am next week. 

Finally (and this is mainly for the Aucklanders out there, but you are all very welcome to contribute), it would be awesome if you'd pop over to Pledge Me ( https://www.pledgeme.co.nz/1268and have a look at my little non profit project to deliver kid's playspaces in the CBD. I'm sorry to fundraise by blog, but I don't have long so I'm desperate (in a dynamic and organised way!).

Linking up to WIP Wednesday at Freshly Pieced. Howdy visitors!


Monday 29 July 2013

Quiltastic lattice

Today marks six weeks until my return to full time work.

*big ole sad face*

I mean working is fine and all for paying the bills, but I wish my employer would see the merit in paying me to swan around home quilting and gardening and other lovely things. Hmmmm - we can't be too grumpy about it though - without work there would be no fabric shopping and that would be a *tragedy* (said in your best Bee Gee voice). 

I've been quilting though.  See. 


It's a bit blurry, but you get the idea. Straight lines in the white lattice and stippling over the patchwork. Which reminds me of a funny story. I was online shopping the other day (gasp in surprise) and I saw some of the Moda Coquette used in this quilt. Except it was called Croquette on the website. Autocorrect fail!  Although deep fried treats and fabric could be a marriage made in heaven. Provided you keep your greasy hands away from the fabric. 

Speaking of which - deep breath - LOOK WHAT HAPPENED. 


It's way worse in real life. I have no idea where it came from, but it's a grease mark on my lattice (nice segue right?!). Agggghhhhh. How do I get it out?

Help me please. Whimper. 

Friday 26 July 2013

Friday five

What have we done this week in the Shush house?


Mother - don't be surprised when you get marmalade for your birthday

Here's hoping it sets properly!  Even though I'm not a marmalade fan, even I thought it tasted okay after adding 1/2 a cup of brandy. Mind you most things are better after 1/2 a cup of brandy, right?!

Finished this (and by finished, I mean made it and then finished eating it - that's the last piece.  Nom nom):

Chocolate caramel gooooodness

Bought some Robert Kaufmann solids for the first time:

Watch me be bright


Received a cute quilty pressie from Mother (all hints on how to use it welcome).  No I didn't iron it for you:

Cushions? Kitchen stuff? Quilt basket?


And (ta dah ... drum roll please ... ) basted the lattice quilt with some 2011 DS fabric hiding in my stash. Quilting here I come:

Oooooh - so close now.  So close.


Linking up to all the fabby linky parties on my party page. Howdy visitors - have a luvverly weekend!

Thursday 25 July 2013

Grapefruit overload

Hey quilty peeps. We've been very busy looking after the wee man this week after his operation. He is doing very well, and still has a smile on his face after all he's been through. He's such a good little chap. 

As a result, there has been very little spare time to do anything, although I did manage to make a small dent in our grapefruit crop. We have an overloaded tree. When we moved into our place three years ago, we discovered a very sad and neglected grapefruit tree at the end of the garden. I think we got about four little grapefruit that first year. We have since chopped some nearby trees to give it some light and given it some citrus food. It turns out that was just the thing. We must have the best part of 80 grapefruit, and that's after the tui have had a scoff. 

And the silly thing is, I don't like grapefruit!  Fortunately Mother is a fan, so I have some whiskey marmalade on the go for her (ummm, surprise mum!). I used an Annabel Langbein recipe last year. Mother assured me it is tasty although I substituted brandy for whiskey - hubby is not keen on his expensive whiskey going into cooking!  Fair call. 

Here are my 2k of grapefruit all beautifully sliced thanks to my kitchenaid food processor. Do I love my food processor?  Oh yeah. It could only be improved by being raspberry ice to match Barbarella. However beggars can't be choosers, so black it is. Tomorrow this lot can be cooked up into marmalade. 


There's nothing wrong with citrus sour cream cake either. I have no idea where that slice went. No idea. 


If you want to try it out, whisk together 125gm softened butter, 1c sugar and the zest of half a grapefruit until light and fluffy. Beat in 3 eggs, one at a time. Sift together 1c of flour and 1tsp baking powder. Fold flour gently into the batter, alternating with 1/2c sour cream. Place in a greased 20cm round cake tin. Bake at 160 degrees Celsius for 45 minutes or until baked through. Place on a rack to cool. 

For a crunchy top, sprinkle generously with castor sugar while still warm and squeeze grapefruit juice over. Serve with yoghurt or whipped cream. 

Mmmmmmmm. 


Saturday 20 July 2013

Super quick Friday

No witty and thoughtful post today! I'm in hospital with the wee man because he's having an operation which was scheduled a long time ago. He's doing great but I, as usual, need sleep. Not surprisingly he has decided he really likes the pretty young nurse and chats and smiles endlessly when she comes in. He's a little rogue already. Good on him, I say. 

But I did manage to get something finished before I came in - that's right - my lattice top.  Yay!  *twirls of excitement*

Here's the photo - there'll be lots of update about it later on. 


AND I found a cool new to me gizmo for pinning seams that have been ironed open. They are from Clover. Shush recommends. What higher endorsement could there be?


Wednesday 17 July 2013

July Status Update

Warning - you are entering a limited sew zone. That's right. There's not much going down. But it does feel like a good time to see where I'm at with my various projects. So here goes.

Puff Quilt. Yeah, nah. Not much going on. But I have managed to buy some more Circa 1934, so if I ever get around to it, I will have enough fabric to finish it. 

Zombie Quilt. Nil progress, although I have decided that despite hubby's best efforts at quilt designing, I will be making what I want. And I have read this for general zombie inspiration. It's awesome, BTW. 

I can only hope Brad Pitt doesn't ruin it


EPP. Nada progress. Well I did cut six diamonds, but I don't think that is worthy of a photo. 

Compiling Parisville collection. Awesome progress, not least of all because the lovely Hydeeann sent me this. How fabulous is she? I love quilty friends! And she just sent it because she's nice. No other reason. 

Just the motivation to do MORE shopping.

Oh Deer. One block more. It's almost too embarrassing to admit. Lets pretend I've done lots more.

Lattice Quilt. Progress. Yes really. See. 

It seems a finished quilt top could be in my future

So I am doing SOMETHING! Once I get the rest of those coloured strips in, we will be all good to sew the blocks together. One of my favourite parts of quilting!  AND I've bought binding, because I can always shop well. 

Linking up to WIP Wednesday. Howdy visitors!

Friday 12 July 2013

Extending the family

First, to prove there has been quilting, here is my next finished EPP block. We have to count these as finishes, or you won't hear from me for three years. You might think that a good thing!

The colour on this is all wrong, but it's the best I can do at night. Thanks for all your EPP tips - I hear there are dissolvable shapes to add to the list of things to try - they just wash out. How awesome is that?!

Block number 4


But more importantly, look who has arrived all the way from Canada - it's Chelsea. She's a bit nervous of getting out of her packaging. It's all a bit different in Auckland. I'm not sure she thinks everyone will be lovely to her. 

Hellllllo Chelsea Shush

Silly girl - everyone will think she's great. 

Having said that, guess who I discovered from the early 90s?  That's right. It's Bunny. Resplendent in faux Laura Ashley puffiness. That dress was never going to be flattering on anybody. Poor thing. I recall making one for Mother at the same time. Bunny hung out in the 90s with dried flowers in baskets, unbleached calico curtains and peach ragged paint walls. Those were the days. Then she got packed away. Which was a better fate than that suffered by the dried flowers and calico curtains. 

I tried to get Princess' toys to talk to her, but they were all "Rosa this" and "Rosa that". I think a makeover may be in order before they will deign to hang out with Bunny. Toys can be so cruel. 

Bunny circa 1993

No wonder Chelsea is nervous. 

Linking up with the Friday parties - links on my linky page. Howdy!

Wednesday 10 July 2013

The low down on EPP (yeah you know me)

Interesting development. Having started EPP, pretty much all my non EPP quilty and non quilty friends want to know how it's done. I am busy trying to take no offence that I haven't been asked how my other quilts were made. I'm fine. Really. 


So I'm giving the low down in one post, rather than repeating it endlessly by phone or email. If you know about EPP I suggest you stop reading now and go look at the photos. One thing is for sure, this is going to be the WIP that goes and goes. 

What it is?

English Paper Piecing is a very old fashioned way of hand making quilts by wrapping fabric around a shape, and then sewing all the fabric shapes together. It's pretty easy, but a bit fiddly and very time consuming - but in a good way. I have discovered there are lots of different ways of doing it, each with pros and cons


Templates

These are the little shapes you wrap your fabric around. As far as I can tell there are:
- hard plastic shapes
- flexible plastic/rubber shapes
- paper shapes

I am using store bought paper shapes because I'm too lazy to make my own and that would be a BIG hassle. It is really important that your shapes are accurate so that they all fit together. One quirk is that the size of the shape is measured down one length. This means if you put different shapes together, you can easily tell what size to use. 


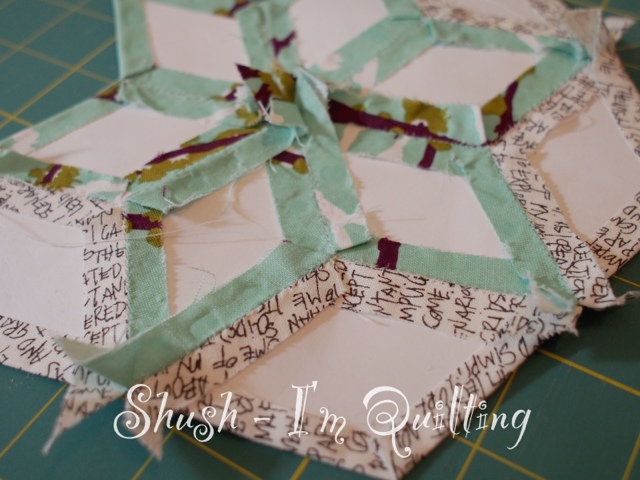
There are HEAPS of different shaped templates. I am using 2" 60 degree diamonds and hexagons, because they go together and I like the look of them. I have discovered that 2" diamonds make a 7" finished hexagon like the one in my photos. 

Having looked around online, it looks as if the benefit to using the plastic shapes is durability, and the flexible ones seem best as they are easier to remove from the fabric once it is all sewn together.

However paper is cheaper, and my bought shapes are a good quality card that can be reused over and over. I'm pretty happy with them. Also, I got a plastic template with the seam allowance included, for cutting my fabric to the right size for my paper pieces. It's clear, so you can see the fabric underneath in case you want to fussy cut a picture to feature on your piece. 


But - if you're broke you could simply make a template out of cardboard and cut your own pieces from thick paper (there are templates you can print on line) and not spend any money. It's quilting for all budgets!

Basting

This is the bit where you wrap the fabric around the little template and baste it so it keeps its shape before you sew the pieces together. It's poos, as Princess would say. I have discovered three techniques:

- hand stitching in the corners - not through the paper - so you can slip your template out after it has been sewn to the other pieces. Pros are that your template is unscathed and can be reused heaps. 
Also, it means your basting never has to be removed, provided you use a light coloured thread that can't be seen from the top of the quilt. Cons - it's the slooooowest method. 


- hand stitching through the paper template. Accordingly to my online research it's faster and best done with bright thread so it is easily seen for removal.  Cons - the basting thread needs to be removed after the pieces are sewn together which I understand can be time consuming. And it's still not the quickest.

- gluing. In my mind, the method with the most potential. Fast and no basting to remove. Cons - get the wrong glue and you'll have a big old sad face. But, as I am SO AWESOME I have done some glue testing for you. Here are the culprits. 


Both available cheaply at your local craft store, unlike the most recommended brand for glue basting online which is eyewateringly expensive for a little glue stick. And to cut a long story short, because I'm getting bored with typing and I'm sure you're getting bored with reading - the UHU glue stick is the winner. 

It's not so sticky when using it - which can be a little frustrating, but it just peels off when it's time to take your paper out. The kids glue on the other hand requires you to wet the paper to dissolve the glue and get it out. So my block was retrievable, but not ideal as I won't be able to use the papers again. I could glue 12 diamonds in under a minute each, which compares very favourably to the five minutes it takes me to baste with thread. And I assume I'll get faster. 


Hints for glue basting - do it on a piece of printer paper so you don't get everything sticky. Baste opposite sides, so the fabric stays square (with thread basting you work around the template). I just zoomed the glue around the edge of the paper, and then put a little extra on the fabric on the corners once the first two sides were folded up. Once all four sides were glued I turned it over right side up and gave the whole thing a good squash down on the table to make sure it was stuck. I had lovely crisp edges. It was all good.  Let the glue dry properly before you sew them up. 

Sewing the pieces together 

This is the bit where you make a pretty quilt. There are heaps of tutorials online about how to whip stitch the pieces together. After you have sewn all the pieces around a shape, you can remove the template. So I can remove the templates from the middle of my hexagon shapes, but not the outside. 

I use (quilting sacrilege) Gutermann polyester thread. It doesn't tangle and is fine enough that most of my stitches are hidden. Don't judge me! And my clover wonder clips hold the pieces together firmly so they align properly - which is harder than you think!


I'm totally bored now!  Did you survive? Here are the next two I've done. 


Linking up to WIP Wednesday, Show n Tell Thursday and Needle and Thread Thursday - links on my party page. Howdy visitors!

Sunday 7 July 2013

Old dog, new tricks

Not much to report here except I've started English paper piecing. 

Yep, the girl who hates hand sewing. 

Except how seriously cute is this?


They're 2" 60 degree diamonds. I'm smitten. There goes the next five years of my spare time. 

I have shamelessly poached the pattern idea from Rita's (Red Pepper Quilts) MIL. I understand her quilt took about three years. *sigh*

And it turns out I hate basting. But I love sewing the little pieces together, because they look so good.  The pleasure, the pain. 

Let's see how long I hang in there, eh!

Friday 5 July 2013

Dressing Chelsea

Happy 4 July American quilty friends!  As Mother is English, I spent the day drinking tea and pondering how best to get you back in the Commonwealth. 

Just kidding. 

Really, I promise. 

But to other things. There have been quilting achievements this week. I now have 36 Oh Deer blocks done. 4 more, and I'm half done. That deserves a post in itself. 

But I also got slightly distracted with my Citrus Sweet Love BOM and the need to find some outfits for Chelsea. Bamboletta Dolls do have a cute selection of extra clothes available, but having spent half of the children's education fund on the doll I need to make my own. 

Surprisingly, there is not a mass of free dolls clothes patterns on the interwebby - unlike quilt patterns. Clearly quilters are much more generous with their knowledge!  But I did find this cute little pattern by Fig and Me, who makes the most incredible dolls. You should check out her website - if she wasn't a doll maker, she could be a photographer. 

I gave it a go with some scraps, in case it didn't work out. The good thing about the pattern is that she shows you how to make it for any sized doll.  I made this one for Baby Rosa. Here she is showing it to her adoring fans. 

Watch out Rosa, Dottywot might go all single pink female on you   

I made some tweaks to the pattern.  I top stitched around the whole top to make it look crisp and help it keep those ribbons secure. 

Yet more Hello Kitty fabric

I also sewed the skirt to the back of the bodice first, so I could topstitch it down on the machine. Instead, the pattern sews the skirt to the front of the bodice, and hand sews the back. As you know, I avoid hand sewing like the plague. Anyway, this way worked great. 

Even doll baby hands are cute

I used one little bit of Velcro at the back. For the next dress, I will use press studs and put three on. I think I would also make the tie out of matching fabric instead of using non-matching ribbon!

Really, couldn't you give me a top too?

I think the pattern could have endless variations, which should be enough to keep me amused for now. Dolls clothes tend to be a short lived passion for me!

Linking up to Show n Tell Thursday,  Confessions of a Fabric Addict , TGIFF and Crazy Mom. Nice to see you!


Wednesday 3 July 2013

Loving my Citrus Sweet Love

There has been happy dancing in the Shush household. My Citrus Sweet Love BOM by Cabbage Quilts and Treehouse Textiles arrived yesterday (early too).

Well I am definitely in the honeymoon phase. Here's my package. Look at those sweet fabrics.

Yay - mail

I divided them in to four little piles for the block I had to make. 

Panic stations - it's cutting time.  I've never been so anxious ...

Here's my first quarter.  Oh wait, because I got all distracted sewing I didn't take any photos. So here is the whole block all done. All those little strips are 1" finished, so it will be a 12" finished block. 

Not so pretty on the white wall.

For me, this was an exercise in accuracy. I have never taken the time to figure out the right measurement for a scant 1/4" seam on my machine, but I did this time. After ummming and aahhing for a while, I figured the blocks were best made with seams pressed to one side, not open. Now I'm usually a seam open kind of girl - I love how flat and crisp the blocks look that way, but there are a lot of curved pieces in the quilt, so pressed to one side seems the best option. 

Then I discovered that if I move my needle setting one click to the right on Bernie, I have a PERFECT 1/4" seam. Yay for me - you'd think the sewing machine makers thought of it. It wouldn't work if I pressed my seams open - it would make the blocks too big, but it's perfect for this.  So all my little seams fitted together perfectly, and for the first time EVER my blocks ended up exactly the right size when done. What an epiphany!  What a pain in the bum all the faffing around was!  I can't see me spending this much time on blocks in the future, but for this quilt, perfection is at least the goal.  You'll see one seam in the bottom left quarter doesn't quite match, but other than that, we're all good.  I am definitely glad we started with the easiest block for a bit of a practice run. 

Then I went on and made my first ever pinwheel. There are 10 to do for the quilt, but I just wanted to give it go. And guess what? Great seams again.  *smug*

That's right - a perfect pinwheel

This is what it supposed to look like finished - in a long, long time.  These photos have been nicked from Cabbage Quilts because, ummmm, I haven't done my quilt yet. Silly. 

Beautiful

See the little pinwheels down the side?

And more beautiful.

So I'm a happy girl.  The BOM package isn't perfect - the instructions certainly assume you know how to quilt, and I would really like an overview of what we're getting each month, but I like the quilt so much, all is forgiven. I'm pretty excited about all the new techniques to learn. 

I can only imagine you're all ridiculously jealous you're not doing it with me. 

Linking up to WIP Wednesday and everywhere else cool on my party page. Howdy visitors!